[This is a draft writeup for a candidate entry in Quick Docs - an issue for which you can find here, awaiting triage]
GNOME can be slow and laggy at times. With the onset of Wayland though, the problem has more than resolved for folks but even then, if the problem seems to have stayed back for you - the following tips might help you fix it to have an overall faster GNOME performance with smoother animations.
Changing the CPU governor
Before getting into modifying it, what is a CPU governor?
A CPU governor decides how the CPU raises and lowers its clock speed in response to the demands the applications place on the system. They can help in striking a balance between performance and battery efficiency or to be inclined towards either.
How do you check the list of available governors for your CPU?
Simply execute the following command, cat /sys/devices/system/cpu/cpu0/cpufreq/scaling_available_governors
This should list the available governors for your CPU -that you can choose from.
Following is an example output.
How do I know which governor is currently active on my CPU, should I have more than one of them?
Simply execute the following command, cat /sys/devices/system/cpu/cpu0/cpufreq/scaling_governor
This should display the governor that is currently enabled on your CPU.
Following is an example output.
How do I increase make the CPU perform better using the governor?
Simply execute the following command, echo performance | sudo tee /sys/devices/system/cpu/cpu*/cpufreq/scaling_governor
Following is an example output.
This sets all the cores to work on the performance governor and the CPU cycles would have an affinity towards higher clock limit.
Advantages
GNOME would now perform significantly faster and the animations would be smoother.
You would notice less artifacts on the GNOME panel and other applets that you use.
Disadvantages
The device is likely to slightly heat up due to active CPU usage and fans would be rolling.
There would be a slight impact on battery life if the CPU constantly stays on this governor.
How do I make the battery life better using the governor?
Simply execute the following command, echo powersave | sudo tee /sys/devices/system/cpu/cpu*/cpufreq/scaling_governor
Following is an example output.
This sets all the cores to work on the powersave governor and the CPU cycles would have an affinity towards lower clock limit.
Advantages
The device is likely to stay cooler due to minimal CPU load and fans would not be used.
The battery life would stay the same for a long time if the CPU constantly stays on this governor.
Disadvantages
GNOME’s performance would be adversely affected and animations would be choppier.
You would notice more artifacts on the GNOME panel and other applets that you use.
What other CPU governors are likely to be available on my CPU?
The command specified in point #1 would list the available governors for your CPU but allow me to explain what each does so that you can pick the right one as per your requirement.
conservative - This makes the CPU stick to the lowest possible clock speed as much as possible but would raise it promptly, once a larger and more persistent load is placed on the CPU. This can strike a good balance between battery life and performance - being slightly more inclined towards battery life.
userspace - This allows any program to be executed by the user to decide what CPU’s operating clock speed should be. The best example is when there is a performance profile application installed by the users which needs elevated privileges to control how the CPU clock speeds scale.
powersave - This makes the CPU stick to the lower clock speed limit, thus saving a huge chunk of battery level and improving battery life but adversely affecting the performance as a result - so every applications would execute significantly slower and animations would be choppier.
ondemand - This makes the CPU boost to higher clock speeds, once a large load is placed on the CPU and slowly reduces the clock speeds once the load is removed. This can strike a good balance between battery life and performance - being slightly more inclined towards performance.
performance - This makes the CPU stick to the higher clock speed limit, thus increasing the performance significantly and making the animations smooth, however ends up adversely affecting the thermal performance, battery level as well as battery life (in a long run).
Reducing the swappiness value
Before getting into modifying it, what is swappiness value?
Swappiness is a property for the Linux kernel that changes the balance between swapping out runtime memory, as opposed to dropping pages from the system page cache. Swappiness can be set to values between 0 and 100, inclusive. A low value means the kernel will try to avoid swapping as much as possible where a higher value instead will make the kernel aggressively try to use swap space.
Why is “reducing” the swappiness value a good idea?
Suppose you have a system RAM with capacity of more than or equal to 16GB and a good frequency of 2400MHz or above - this should be more than sufficient to load entire programs on the memory and execute from there in most circumstances. Having a higher swappiness value in this scenario disregards all the good that the primary memory could have brought you and makes you depend on a much slower secondary memory device, as that is where the swap partition resides - thus causing a bottleneck. Reducing the swappiness value is a good idea as it would make the scheduler proactively use the primary memory as much as possible.
Why is “increasing” the swappiness value a good idea?
Suppose you have a system RAM with capacity of less than or equal to 4GB and an okayish frequency of 2133MHz or lower - this is not at all sufficient to load even browsers completely on the memory and execute from there in most circumstances. Having a lower swappiness value in this scenario adds undue load on the primary memory which is undercapable and you are likely to frequently face out-of-memory errors due to such a configuration. The increased tendency to swap pages to the secondary storage device would allow execution of larger programs (with size larger than the primary memory) and increasing the swappiness value is thus a good idea.
How do I check current swappiness value?
Simply execute the following command, cat /proc/sys/vm/swappiness
This would display the current swappiness value for your system which is 60 by default for Fedora.
Following is an example output.
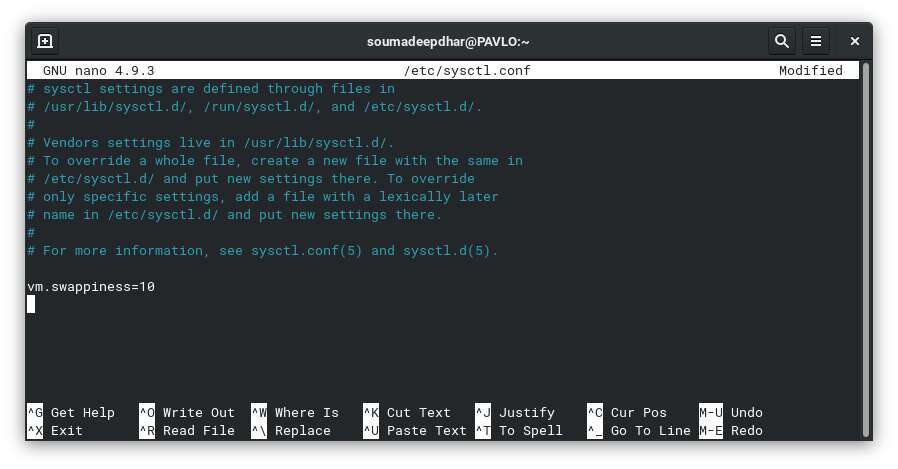
How do I change swappiness value?
Open /etc/sysctl.conf with a text editor of your choice.
For example sudo nano /etc/sysctl.conf
Following is an example output.
It’ll be better to quantify “slight” when making these suggestions. Otherwise, the next thing you know. you’ll have questions about why the battery is only lasting half the usual time
Also, these changes will not survive a reboot, will they? I’d also add references if this is going to be a quick-doc: to the kernel docs and so on. At the moment, there aren’t any.
You can use the similar instructions for switching up to any CPU governor of your liking on boot. Just switch the CPU governor name in the shellscript file mentioned in step #2.
I don’t know if it’s just me but a systemd service feels a tad more safer than having those configurations in the mkinitcpio because I can disable/stop/restart/enable those configurations on the fly whenever I want even when the device is running.
I don’t think that is possible with the kernel command-line parameters. Correct me if I’m wrong but I think a reboot is most likely mandatory to make sure that the changes made are actually reflected.
Hrm? The kernel command line parameter documentation I mentioned lists the cpufrequency scaling governor option:
        cpufreq.default_governor=
                        [CPU_FREQ] Name of the default cpufreq governor or
                        policy to use. This governor must be registered in the
                        kernel before the cpufreq driver probes.
I don’t see why a systemd service that requires a user to create a systemd file etc. is safer tbh. Why include systemd when this is all kernel stuff that’s completely unrelated to systemd? You’re just adding another place where someone may make an error.
All of this can be updated on the fly as you’ve documented, without needing systemd files, no?
In general, I’d prefer not to have this sort of thing documented—advanced users don’t need a quick doc, and we shouldn’t be suggesting non-advanced users to do this kind of thing. If a quick-doc is written up, it must start with sufficient warnings about the possible consequences of tinkering with these settings.
(I mean I consider myself an advanced user and have never felt the need to tinker with any of this even when developing or building heavy-duty packages etc.)
Like I said. My 4-year old Inspiron 5577 makes it slight but I would appreciate folks who could quantify this difference.
2x to 4x might be a bit too far-fetched. Let’s wait on the quantification of the difference or better yet, I might just add in that people would want to stay connected to a power adapter when using the performance CPU governor.
Certainly. The sole reason why I decoupled the systemd part of the guide from the actual one because I think there might be a better way of enabling the governor on boot. The service part is totally optional.
Most laptop users deal with an okayishly-responsive GNOME with choppy animations as their CPU governor is set to powersave (Intel Core users) or conservative (AMD Ryzen users) out-of-the-box and they are unaware as to why GNOME lags on them so much. To address the need of such users, I believe we should have this documented in a Quick Docs with minimal yet appropriate warnings.
Suggesting the systemd service part of the guide might not be a good idea, like you mentioned, for non-advanced users but the other parts are pretty harmless. We might not need to included warning for the first part of the guide (at all) but we definitely should if we want to suggest them the script to enable CPU governors on boot. (That script would need some more looking into, don’t you think? )
Is this based on some evidence/data? If this is indeed the case, the workstation SIG that builds the Fedora workstation product should be notified to change the default governor etc. Making users change it and risking them breaking things should not be our first thought
Checked 3 laptops so far. Found a common pattern here.
The makers were HP, Dell (mine) and Lenovo.
Most certainly. We would want to have a deeper survey though. As much as you might say that 3 is not enough, it does form a pattern - something we would confirm by it.
Like I mentioned, the first part does not literally break stuff as a reboot would restore back the configuration like as it was before so I don’t really see a reason why they would be breaking things by following the guide here.
The second part about having the enable that configuration can be tricky (and risky) so we would want to have warnings for those wanting to implement it.
The workstation SIG, and the kernel development community do this. There’s a reason why powersave is the default. But yes, best to approach the workstation SIG, and I’m sure they’ll be happy to share their findings and discuss changes. If this does go through, it will most definitely require the change process to be followed so that the community can discuss it:
It isn’t users trying to break stuff, it’s them missing things and causing breakages. One should not assume that the target audience is well versed or advanced enough to make system level changes, especially ones that require editing system files.
That is true. Not every user would be seeking for better animations or fluidity at the cost of worsened battery levels. Approaching the Workstation SIG would be the first thing to do here.
(I could use some more information on this )
That is correct too. Should we add warning flags on the documentation then? (or drop it off entirely? - might help the savvy ones so I wouldn’t suggest)
yawn. @t0xic0der heads to sleep. Have a good day, @FranciscoD